 Wednesday, April 30, 2025 -
GGIR updates
GGIR release 3.2-6
Friday, November 18, 2022
GGIR for those without prior R experience
R package GGIR has been designed with the ambition to be user-friendly without prior R experience. For example, usage of GGIR entails only a single function call that takes care of data loading, analyses, and report generation. The primary learning curve for new GGIR users is to become familiar with all the optional input arguments.
Nonetheless, for those without prior R experience it can be a challenge to find your way around the R environment itself. To help you with this, we have compiled the following R tutorial tailored to what we think you need to know about R in order to get started with GGIR.
1. R and RStudio
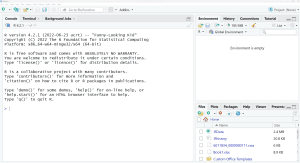
- If you already had R installed: Check which R version you are using, which is shown when you open RStudio at the top of the window named Console. Next, go to the R release history and verify that you are using an R version that is no more than 1 year old.
- If you already had RStudio installed: Check that it is up to date by clicking on the Toolbar: Help -> Check for updates.
2. Using an R script
- Go to the RStudio Toolbar -> File -> New file -> script. This will open a new empty script.
- Type inside the script: print(2 + 2)
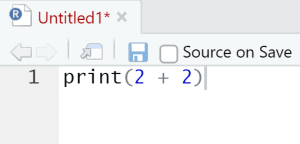
- The text print(2 + 2) is called R code.
- Save the file somewhere on your computer with Toolbar -> File -> Save as…
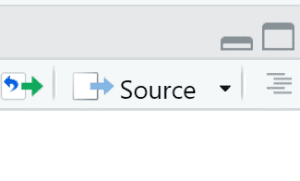
- Press the Source button in the top corner of your script.
- Do you see a 4 in the RStudio console window?
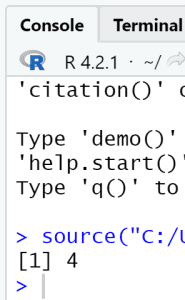
- Now put a hashtag in front of print(2 + 2) as in # print(2 + 2)

- Repeat steps 4 and 5.
- If all went well you do NOT see a 4 this time.
- This is because adding a # at the beginning of line comments out that line, which means that RStudio will not execute it.
- If you put the # at the END of a line of code then everything you type on the line after the # will be a comment. For example:

- Note that in other R introduction courses you may learn to type the R commands directly in the console window. We are not doing this because our GGIR commands are going to be long and it would be impractical to type them in the console. Instead we strongly recommend you to follow the steps above and work with R scripts for everything you do with GGIR.
3. Characters and vectors
- Replace the code by: print(“hello world”)
- Save the script (Hint on with Ctrl + S or Command + S on Mac is a short key to save a file without having to use the toolbar).
- Press again the Source button.
- Do you now see “hello world” in the RStudio console window?
- Replace the code by: print(c(1, 2, 3, 4, 5))

- Save the script and press again the Source button.
- Do you now see 1 2 3 4 5 in the RStudio console window?

- What c() does is that it creates a vector from the character or numbers inside it.
- Replace the code by: print(1:5)
- Save the script and press again the Source button.
- Do you now see 1 2 3 4 5 again? This is correct, 1:5 is the same as c(1, 2, 3, 4, 5).
4. Using functions and looking up documentation
- Replace the code by: print(cor(x = 1:10, y = 2:11))
- Do you see a 1?
- You just used the R function cor. To look up what cor does, go to the console and type ?cor and press Enter.
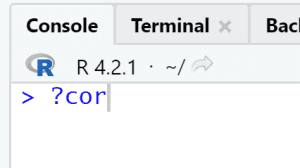
- Do you now see the documentation for the cor function and can you tell what function cor calculates?
- As you may have noticed we are specifying an x and a y in the cor command. x and y are what we call function arguments to the function ‘cor’ and in this case the argument value specified for x is 1:10 and the argument value given for y is 2:11. In GGIR you will be working with a lot of function arguments which can have character values such as “hello world”, numeric values like 4, or numeric vector values such as c(1, 2, 3, 4, 5) or 1:5. Additionally we will be working with Boolean argument values, which can be TRUE or FALSE. Note that these have no quotes around them. For example, we will use Booleans to tell GGIR to do something or to not do something.
5. Specifying a file path
- Replace the code by file.exists(“C:/Users/vvanh/Desktop/tutorial.R”)

- Now edit this line such that it specifies a file that exists on your computer, it can be any file and does not have to be the tutorial.R file in this example.
- Save the script and press again the Source button.
- Do you now see TRUE in the console? If yes, then this means you specified the file path correctly. If you see FALSE then something went wrong. Keep trying until you see TRUE. Hint: R expects forward slashes, and when specifying a file always include the file extension (.xlsx, .txt, .docx, .bin, .gt3x, .cwa, .R, .csv, etcetera) even if your Windows file browser does not display them.
6. Specifying a folder path
- Replace the code by myfolder =”C:/Users/vvanh/Desktop/”.
- And add a second line with: print(dir.exists(myfolder))
- Edit this such that it specifies a folder that actually exists on your computer, it can be any folder and does not have to be the Desktop as in this example.
- Save the script and press again the Source button.
- Do you now see TRUE in the console? If yes, then this means you specified the folder path correctly. If you see FALSE then something went wrong. Keep trying until you see TRUE.
- Add a new line: print(dir(myfolder))
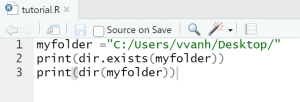
- Save the script and press again the Source button.
- If all went well you should now see in your console window a list of the content of your folder.
7. Update all installed R packages
- R packages also sometimes referred to as R libraries complement that base R functionalities, such as cor(), print(), and dir.exists(). There are thousands of R packages and GGIR is one of them. Before we install GGIR it is advisable to first check that all existing packages are up to date.
- In RStudio go to Toolbar -> Tools -> Check for package updates…
- This shows you an overview of R package that are not up to date.
- If the list is not empty, click the “Select all” button and next the “Install all” button. RStudio wil now update all the package updates.
8. Check whether GGIR is already installed
- Go to the console window and type: library(GGIR)
- If you see the message “Error in library(GGIR) : there is no package called ‘GGIR’ ” then that means that GGIR is not installed yet.

- If GGIR is installed you will see no message.
9. Install GGIR
- In RStudio go to Toolbar -> Tools -> Install packages…
- Make sure the ‘Install from’ field is set to CRAN.
- Type GGIR in the empty field.
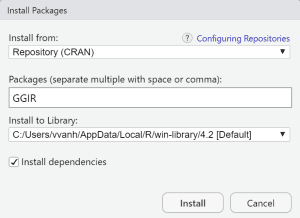
- Click install, the installation will automatically start. You may be prompted with questions, click yes.
- Note that an alternative route to installing R packages is with the command: install.package(“GGIR”, dependencies = TRUE), where you should replace “GGIR” by the package(s) you want to install.
10. Check R and GGIR version
- Type library(GGIR) on the command line and press Enter.
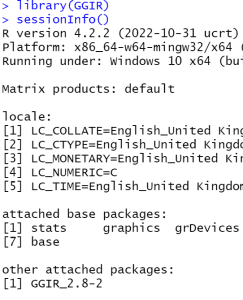
- Type sessionInfo() on the command line and press Enter.
- This should show you in the console Window the R version, the GGIR version that is currently loaded, and various other information. In the example below you see that I had R version 4.2.2 and GGIR 2.8-2 installed at the time when I made the screenshot.
11. Some final notes on RStudio
- Earlier in this blog post we asked you to use the Source button. It may be worth highlighting that there is another button next to the Source button, which is the Run button (see image).
 The Run button tells RStudio to only execute a specific script line or a selection of lines from the script. Next RStudio copies each of those lines to the console, runs them, and shows the output value. In theory you can also use the Run button and some GGIR users only use the GGIR button. However, there are couple of challenges with using the Run button: It can quickly clutter your console window with information you may not even be interested in, and it can easily lead to mistakes by forgetting to re-run parts of your script necessary for the computation. Therefore, the safest way to work with GGIR may be to use the Source button. In that way you know for sure that you always run all the lines in a script and that only information is printed to the console that is intended to be read by you.
 - RStudio offers many shortkeys to do many of the operations fast. We encourage you to explore these as they can save you a lot of time. For example, Ctrl+A followed by Crtl+I tidies up the indentation of your script (Mac users will have to replace the Ctrl key by the Apple Command key).
Once you have mastered the above steps you should be all set to explore GGIR via the online free documentation.

